
Statiq Web is a powerful static web site generation toolkit suitable for most use cases. It's built on top of Statiq Framework so you can always extend or customize it beyond those base capabilities as well.
Quick Start
The easiest way to get started with Statiq Web is to install the Statiq.Web package into a .NET Core console application and use the bootstrapper to configure everything.
There's no statiq.exe. Unlike other static generators which ship as a self-contained executable, Statiq is a framework and as such it runs from within your own console application. This provides the greatest flexibility and extensibility and is one of the unique aspects of using Statiq.
Step 1: Install .NET Core
Statiq Web consists of .NET Core libraries and installing the .NET Core SDK is the only prerequisite.
Step 2: Create a .NET Core Console Application
Create a new console application using the dotnet command-line interface:
dotnet new console --name MySite
Step 3: Install Statiq.Web
In same folder as your newly created project (i.e. MySite).
dotnet add package Statiq.Web --version x.y.z
Use whatever is the most recent version of Statiq.Web. The --version flag is needed while the package is pre-release.
Step 4: Create a Bootstrapper
Creating a bootstrapper for Statiq Web initializes everything you’ll need to generate your web site. While you can certainly extend Statiq Web with new pipelines or custom modules, you shouldn’t need to for most sites. Add the following code in your Program.cs file:
using System.Threading.Tasks;
using Statiq.App;
using Statiq.Web;

namespace MySite
{
  public class Program
  {
    public static async Task<int> Main(string[] args) =>
      await Bootstrapper
        .Factory
        .CreateWeb(args)
        .RunAsync();
  }
}
Alternatively if you're using .NET 6 and have <ImplicitUsings>enable</ImplicitUsings> in your project file,
you can make use of top-level statements and implicit usings to simplify your Program.cs file
and this is all that's needed:
return await Bootstrapper
  .Factory
  .CreateWeb(args)
  .RunAsync();
Step 5: Add Some Content
Start adding content by creating Markdown files in your input folder (by default the input folder is located in your project root).
To get something started, you can add the following code as index.md file in your input folder.
Title: My First Statiq page
---
# Hello World!

Hello from my first Statiq page.
Step 6: Run it!
Let the magic happen:
dotnet run
This will create an output folder in your project folder by default (if it doesn't already exist) and generate static web site content based on what's in your input folder.
You can also preview the generated site:
dotnet run -- preview
This will generate content and serve your output folder over HTTP (i.e. http://localhost:5080).

Next Steps
🎨 Download a theme like CleanBlog.
📖 Read the guide to learn more about all the features of Statiq.
💬 Use the Discussions for assistance, questions, and general discussion about all Statiq projects.
🐞 File an issue if you find a bug or have a feature request related to Statiq Web.
How It Works
Statiq is powerful because it combines a few simple building blocks that can be rearranged and used in limitless combinations. Think of it like LEGO® for static generation.
Content and data can come from a variety of sources.
Documents are created that each contain content or data and metadata.
The documents are processed by pipelines.
Each pipeline consists of one or more modules that manipulate the documents given to it by transforming, aggregating, filtering, or producing entirely new documents.
The final output of each pipeline is made available to other pipelines and may be written to output files or deployed to hosting services.
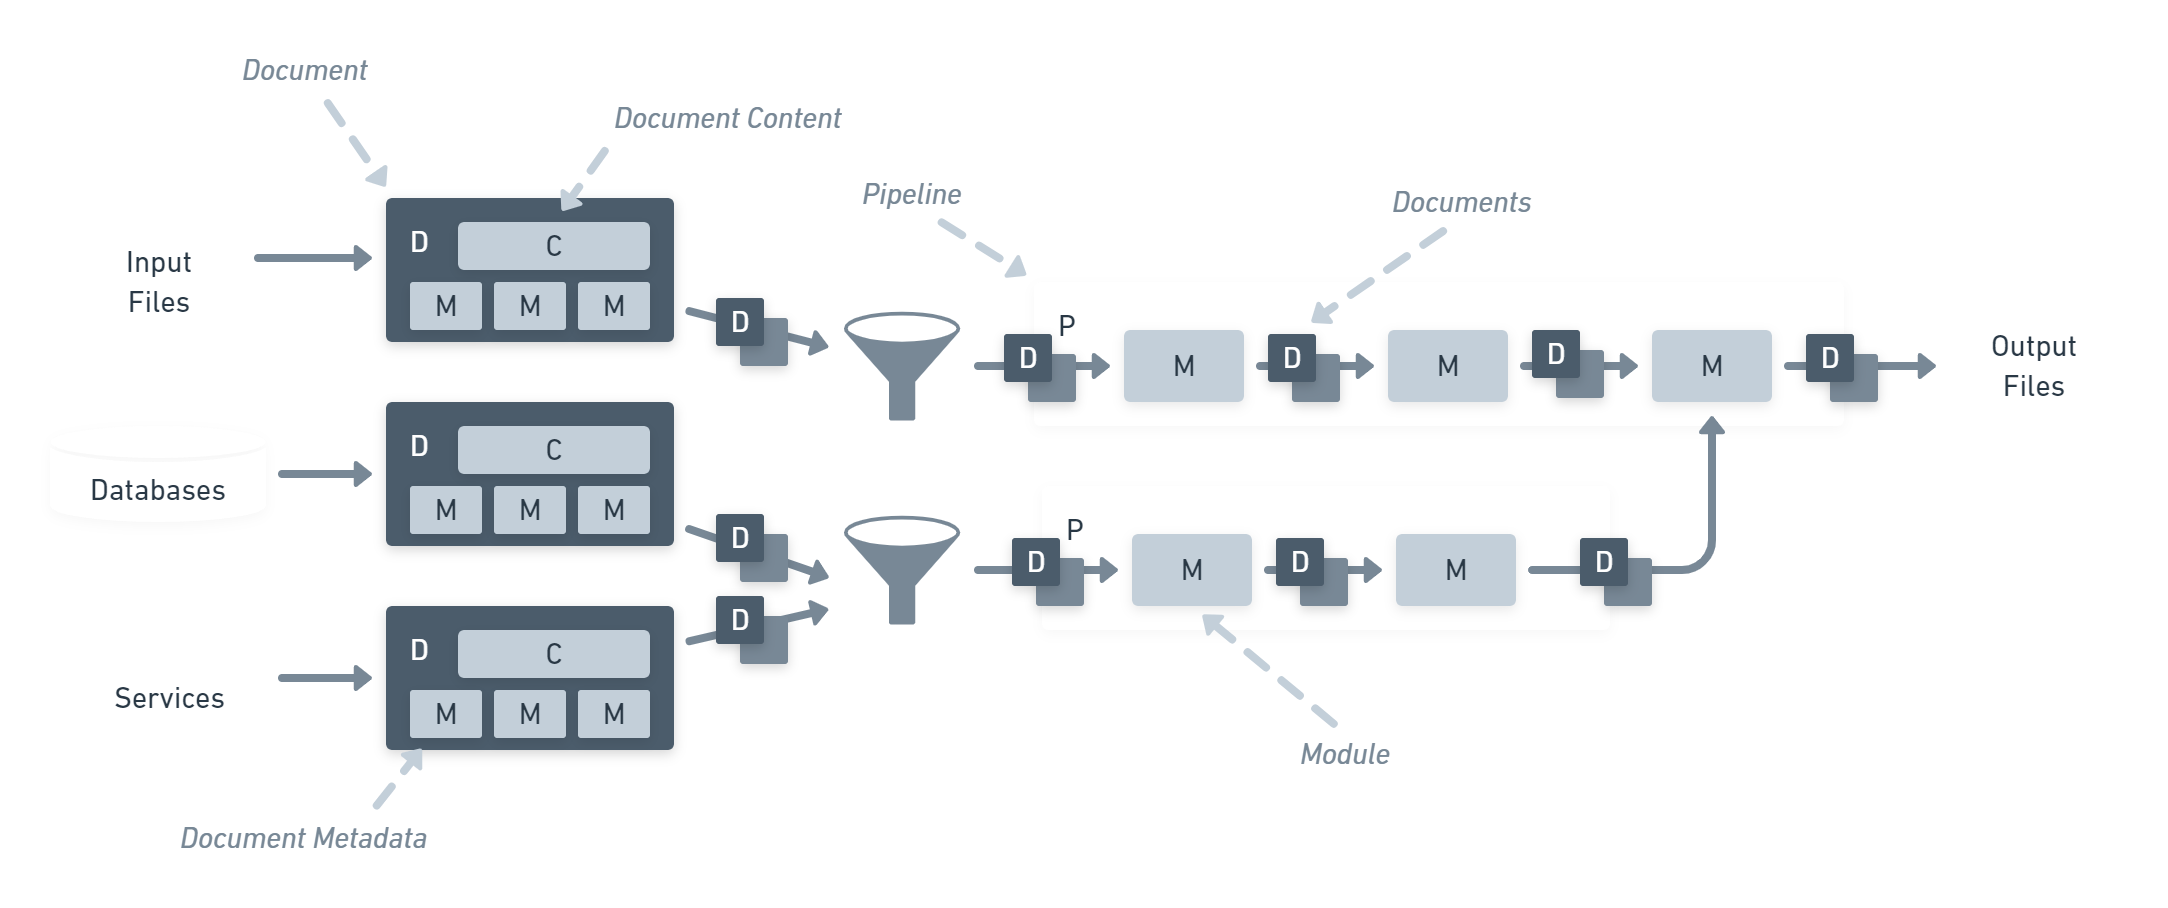
Statiq Web includes pipelines, modules, and other functionality related to generating web sites out of the box.